
Importing Data with Flexible Mapping
Import data from your own Excel or CSV files by mapping your columns to VaultN fields.
Flexible Mapping lets you import data, such as promotions, directly from your own Excel or CSV files without using a predefined VaultN template.
Instead, you tell VaultN which columns in your file correspond to which VaultN fields. For example, you can map a column named my_sku to the SKU identifier in VaultN.
VaultN then validates your data and provides a summary of the import before any changes are applied.
Why use Flexible Mapping
- Use your existing files: no need to restructure your data to match a VaultN template.
- Map columns your way: column names and their order don't need to match VaultN's fields.
- Validate before importing: review matched items, missing values and potential errors before confirming.
- Save time on future imports: save your field mappings as a reusable Mapping Template.
Before you start
Flexible Mapping follows the same process across different import types. It currently supports promotion imports, with more import types planned.
File requirements
Before uploading, make sure your file:
- Is an Excel (
.xlsx) or CSV (.csv) file - Contains column headers that identify the data in each column
- Includes at least 1 column that identifies each item, such as a SKU or product ID
- Contains no more than 5,000 rows
- Is smaller than 10 MB
Your file doesn't need to contain every field required by VaultN. You can define missing fields manually during the import, if the field supports manual values. You can also ignore optional fields.
Column headers don't have to be in the first row. You can specify which row contains your headers when uploading your file.
TipAdd your identifiers to VaultN using External References to match items during imports with identifiers such as publisher SKUs, Steam App IDs or other custom references.
Start an import
- Go to Import Hub → Import.
- Under Select what to import, select Promotion.
- Under Select import source, select Upload a file.
- Click Continue.
How to import your file
The import process has 6 steps. No changes are applied until you confirm the import in the last step.
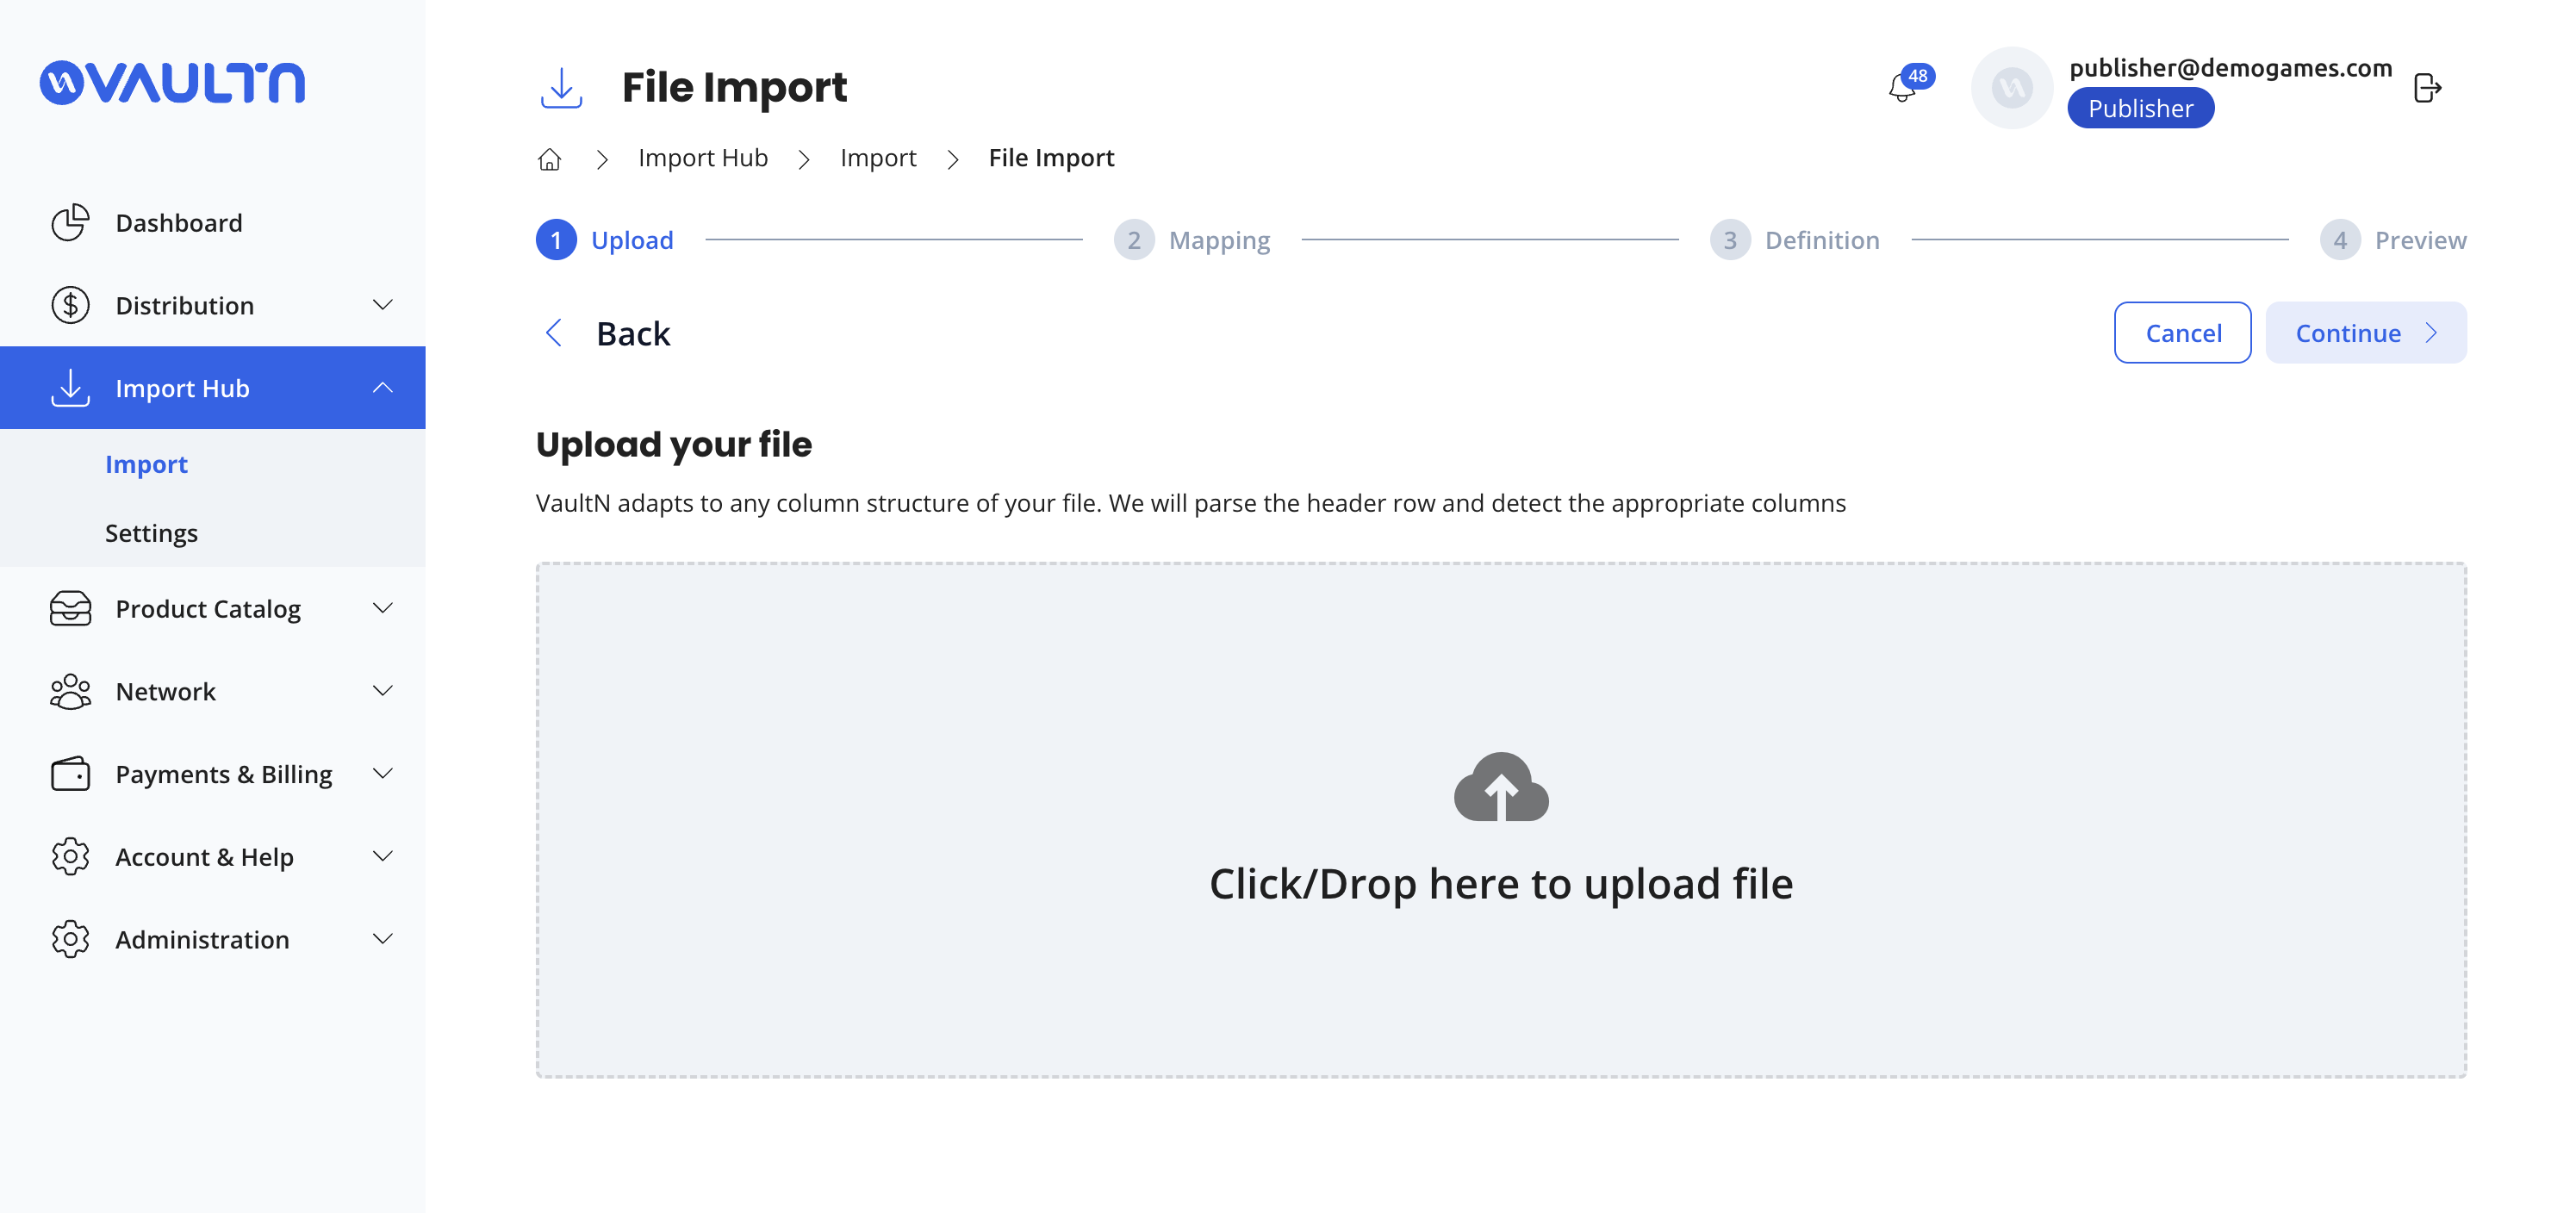
In the VaultN Portal, the progress bar shows 4 screens: Upload, Mapping, Definition and Preview. Steps 2 and 3 both happen on the Mapping screen, and steps 5 and 6 on the Preview screen. Click Back to return to a previous screen, or Cancel to stop the import.
Step 1: Upload your file
- Click Click/Drop here to upload file and select the Excel or CSV file you want to import, or drag your file onto the upload area.
- If your column headers aren't in the first row, specify which row contains them.
- Click Continue.
VaultN reads your file and prepares it for mapping.
Step 2: Choose your identifier
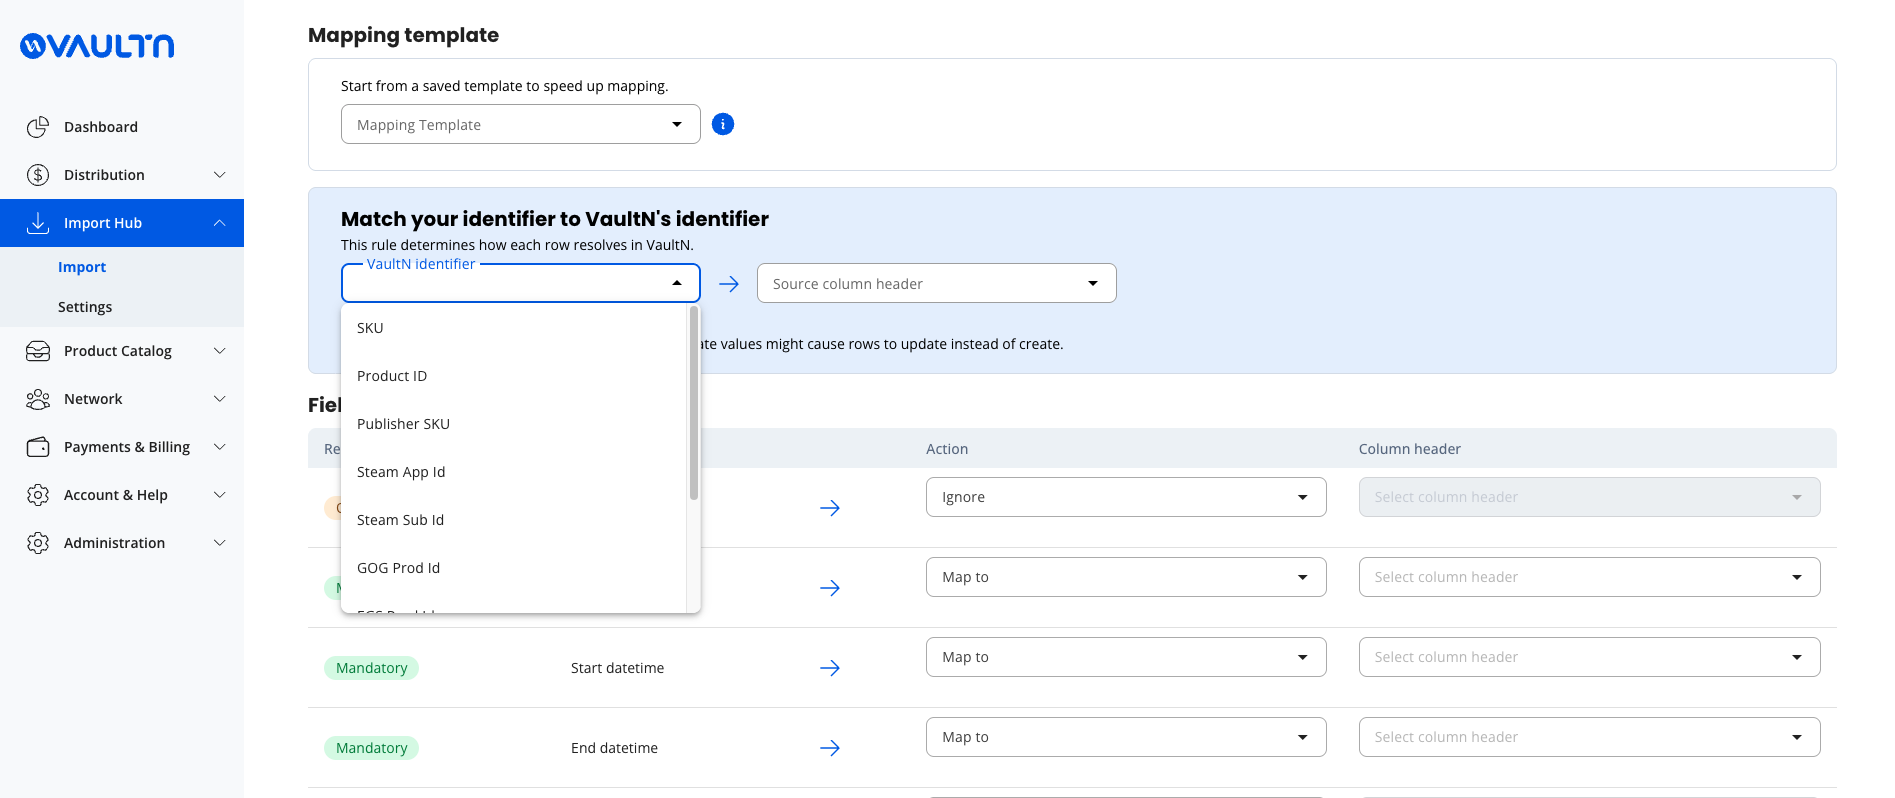
The identifier tells VaultN which item each row in your file refers to. Under Match your identifier to VaultN's identifier, select 2 things:
- VaultN identifier: how items are identified in your file, for example, SKU, Product ID, Publisher SKU, Steam App Id, Steam Sub Id or GOG Prod Id. The options depend on the reference types enabled for your account.
- Source column header: the column in your file that contains the selected identifier.
VaultN uses these identifiers to match the rows in your file against items in your catalog. For the best results:
- Make sure identifier values match those stored in VaultN.
- Make sure every row contains an identifier.
- Avoid empty identifier cells, as these are flagged as Missing Value. [TO CONFIRM: reason value label]
ImportantEach value in the identifier column must be unique. Duplicate values might cause rows to update instead of create.
If your identifier refers to a higher-level entity than the data being imported, VaultN asks how the values should be applied. See Working with higher-level identifiers.
Step 3: Map your fields
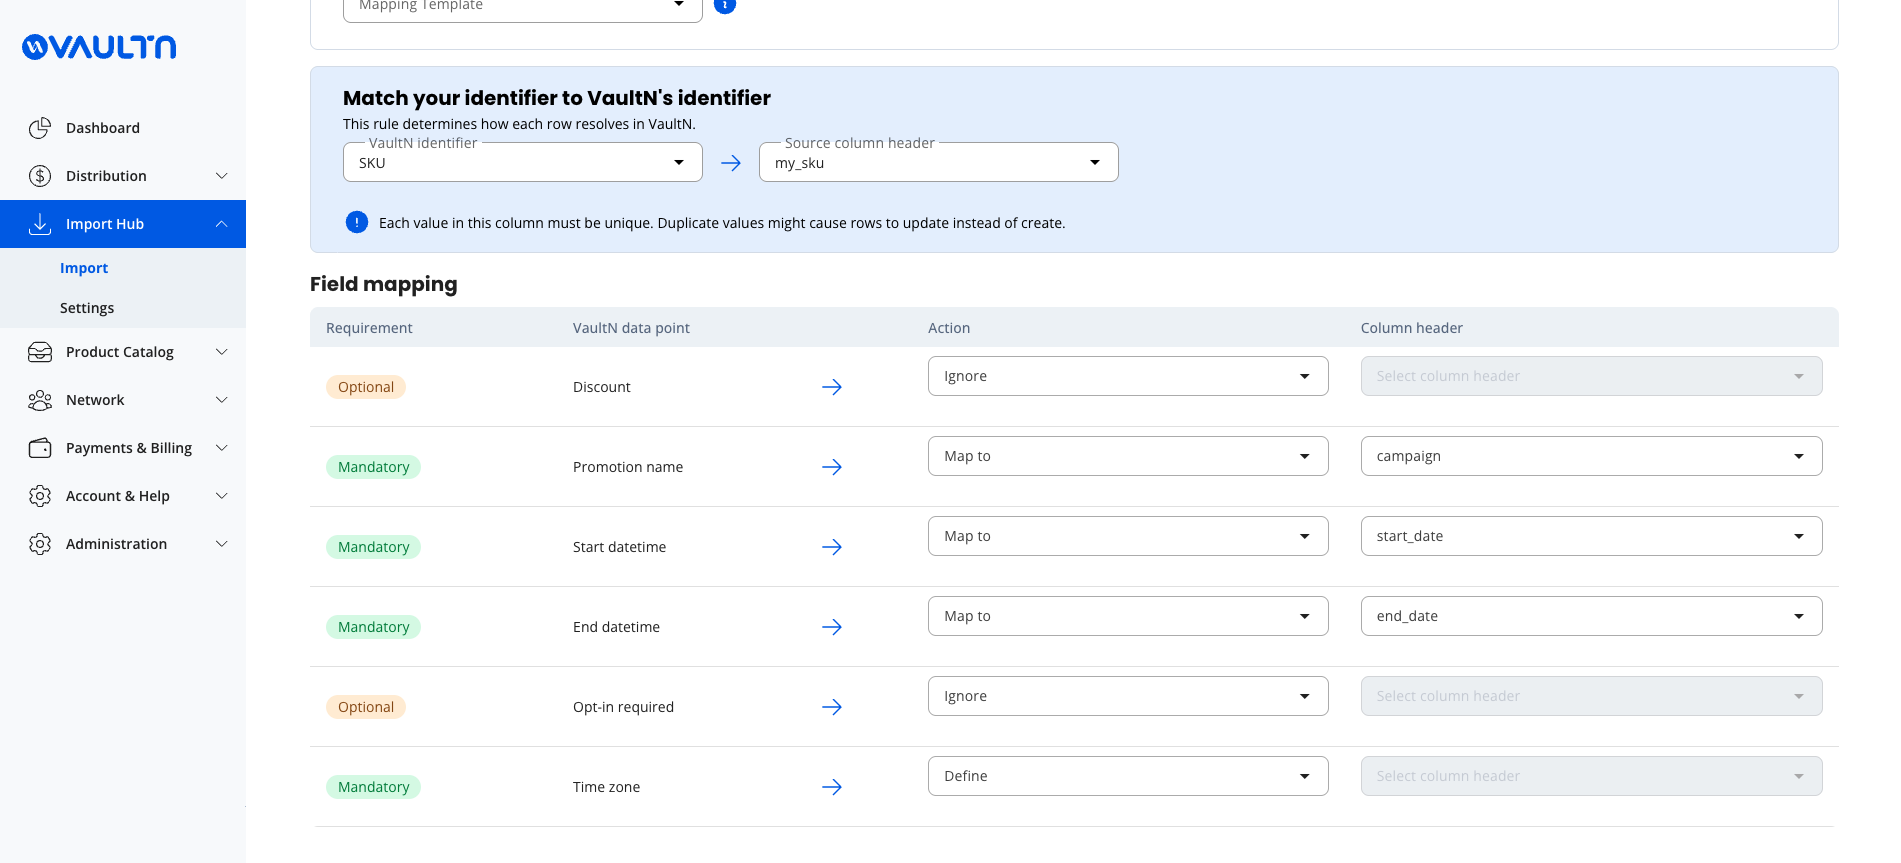
Under Field mapping, VaultN displays each VaultN data point available for your import and marks it as Mandatory or Optional. For promotions, these include Promotion name, Start datetime, End datetime, Time zone, Discount and Opt-in required.
For each field, select one of these actions under Action:
| Action | Description |
|---|---|
| Map to | Use values from a column in your uploaded file. Select the corresponding column under Column header. |
| Define | Manually specify a value in the next step. This value applies to the entire import. Not all fields support this option. |
| Ignore | Exclude the field from the import. Only available for optional fields. |
All mandatory fields must be mapped or defined before you can continue.
If a column contains incompatible data, such as mixed or unsupported value types, VaultN flags it and prevents it from being mapped to incompatible fields.
When you're done, click Continue. VaultN offers to save your mappings as a template. See Save your mappings for future imports.
Step 4: Define remaining fields
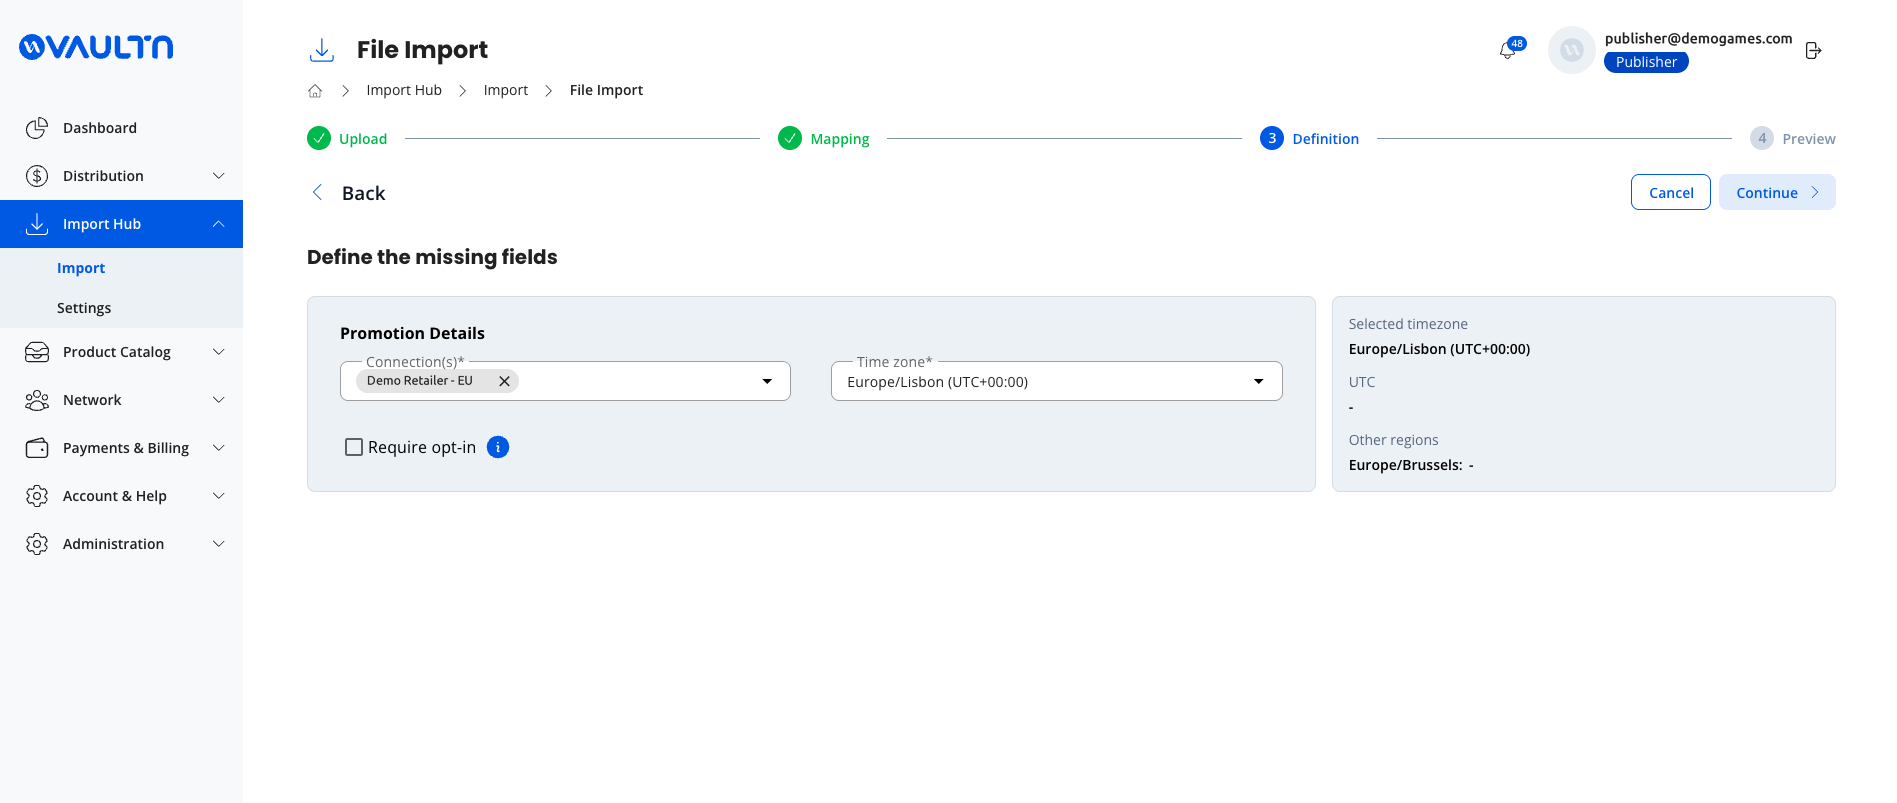
Under Define the missing fields, enter the values for any fields you set to Define. For promotions, these include:
- Connection(s): the retailer connections the promotion applies to
- Time zone: the time zone for the promotion dates. The side panel shows the selected time zone and the matching time in UTC and other regions.
- Require opt-in: select this if the promotion requires opt-in
These values apply to all relevant items in the import. Fields marked with * are required.
Some fields may already contain suggested or default values. You can review and adjust these before continuing. Then click Continue.
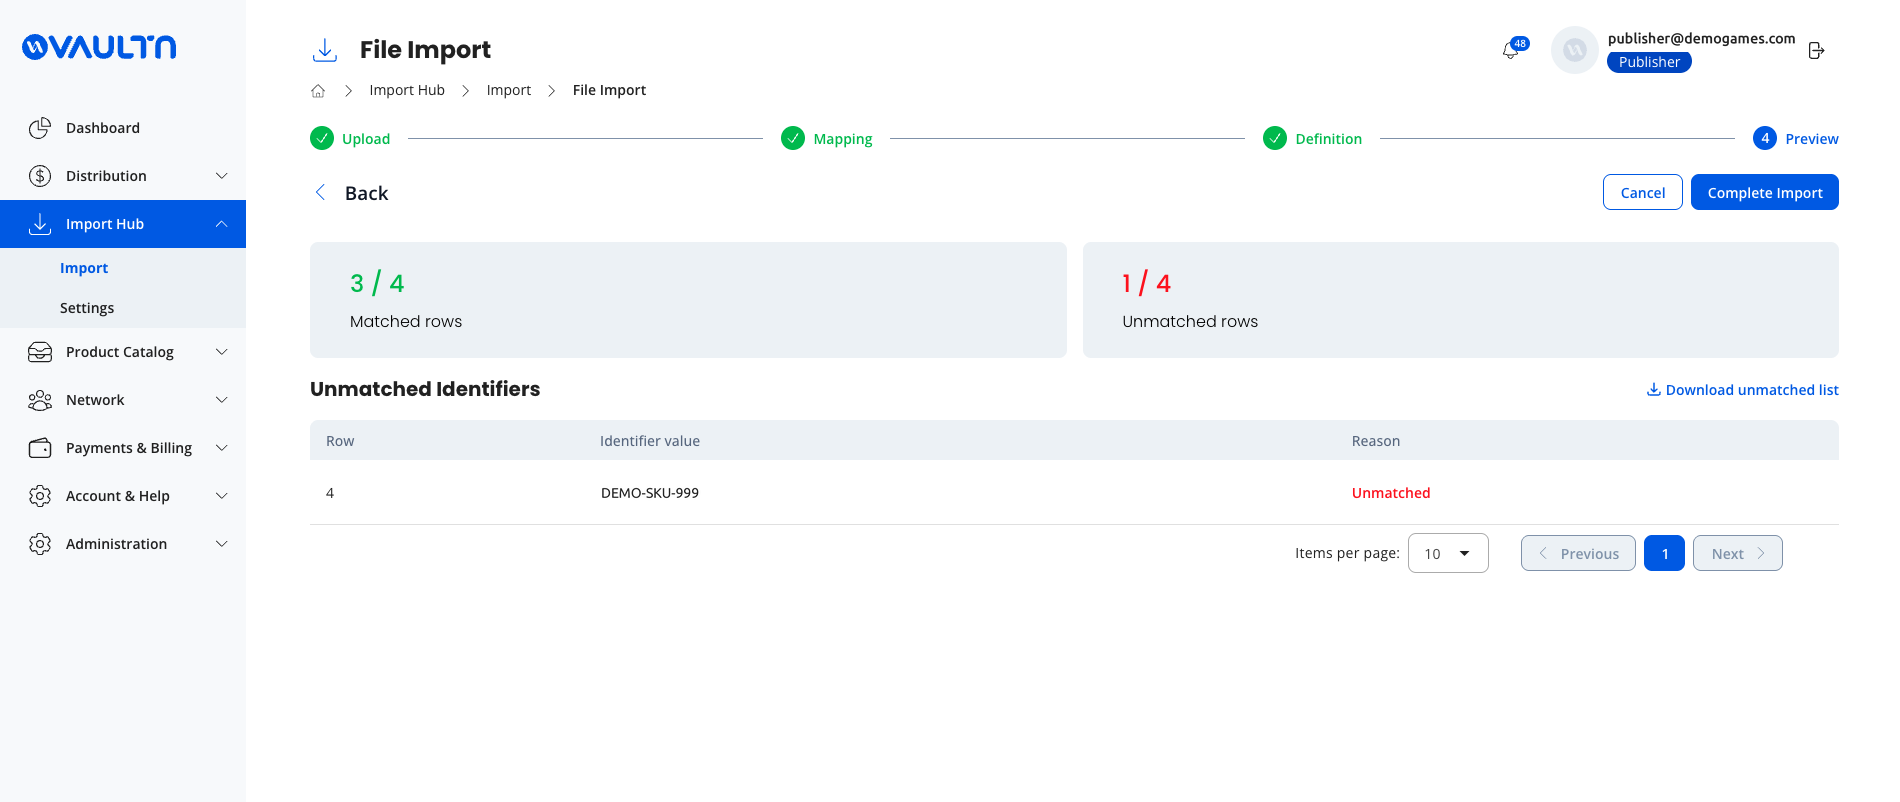
Step 5: Review your import
Before applying any changes, VaultN provides a summary of your import:
- Matched rows: how many rows were successfully matched to items in your catalog, for example, 3 / 4
- Unmatched rows: rows that couldn't be matched. The Unmatched Identifiers table shows each row's Row number, Identifier value and Reason, such as Missing Value or Not Found. [TO CONFIRM: reason value labels]
- Invalid values: rows containing values that couldn't be processed, such as text in a numeric field
Rows containing invalid or unmatched data are skipped.
To review and correct unmatched items before trying again, click Download unmatched list.
Review the summary carefully to make sure the expected items and values will be imported.
Step 6: Confirm your import
When you're satisfied with the summary, click Complete Import to apply your changes.
VaultN displays the results, including the number of rows that were:
- Applied: successfully processed and imported
- Skipped: excluded because they couldn't be matched or contained invalid data
- Failed: could not be processed successfully
If you need to make corrections before importing, return to the mapping step or upload an updated file.
Working with higher-level identifiers
Sometimes your uploaded file identifies items at a higher level than the data you're importing.
For example, your file might contain product IDs, while promotion discounts are applied at SKU level. Since a single product can contain multiple SKUs, VaultN needs to know which SKUs should receive the imported values.
In these situations, you can choose to:
- Apply to all: apply the imported values to every item associated with the identifier, for example, all SKUs belonging to a product.
- Apply with filters: apply the values only to items matching specific criteria, such as SKUs for the EU region and PC platform.
VaultN uses your selection to determine which items are affected.
When importing data at a higher level, the import summary reflects the number of items that will be updated. This may differ from the number of rows in your uploaded file.
Save your mappings for future imports
What are Mapping Templates?
Mapping Templates let you save your column-to-VaultN field mappings so you can reuse them in future imports.
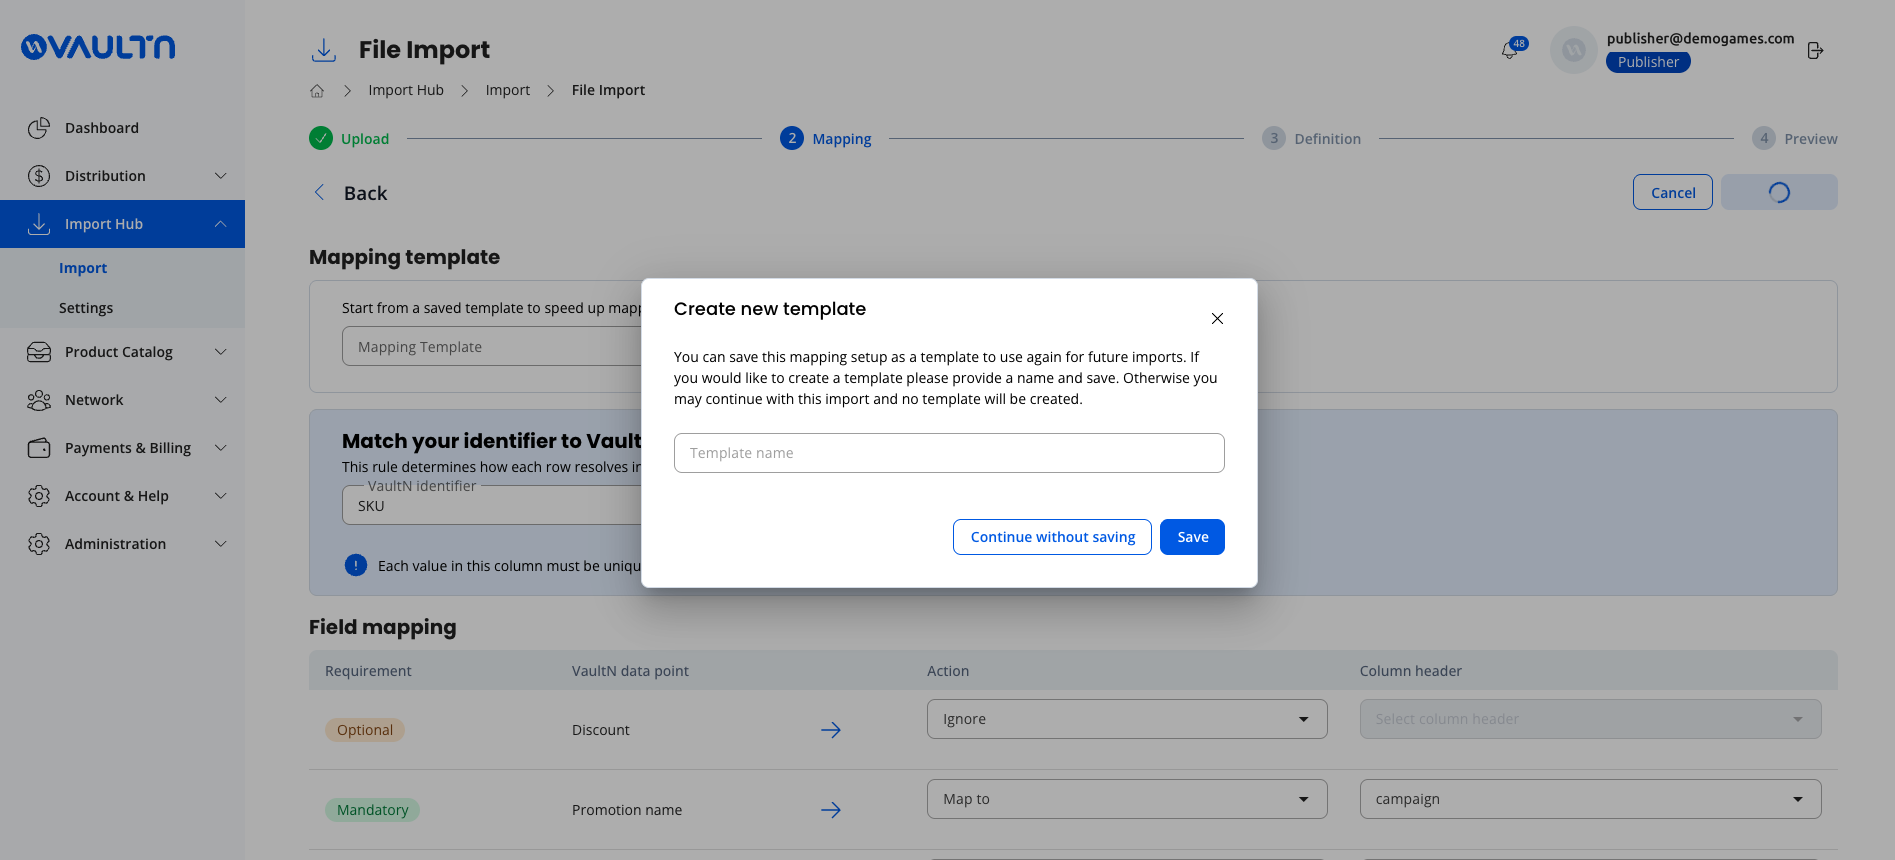
When you click Continue after mapping your fields, the Create new template dialog opens:
- Enter a recognizable Template name so it's easy to find later.
- Click Save. To continue without creating a template, click Continue without saving.
Mapping Templates are shared across your company, so your colleagues can reuse the same configuration.
Reusing a Mapping Template
The next time you import a file:
- Upload your Excel or CSV file.
- On the Mapping screen, select an existing template under Mapping Template.
- VaultN automatically maps columns based on their names.
- Review the mappings and make any necessary adjustments.
- Continue with the import process.
If your file contains new or missing columns, VaultN prompts you to review the affected mappings.
If your previous configuration included filters for higher-level identifiers, you can also review and confirm those settings.
Using Mapping Templates helps reduce repetitive work and keeps imports consistent across your team.
FAQ
What can I import using Flexible Mapping?
Flexible Mapping currently supports promotion imports. Support for additional import types is planned.
Can I use my internal product or SKU references when importing?
Yes. If you've added your internal product or SKU identifiers to VaultN as External References, you can select them under VaultN identifier to match items during the import.
Do my column names need to match VaultN's field names?
No. You can use your existing column names and map them to the corresponding VaultN fields during the import process.
Does the order of columns matter?
No. VaultN uses your field mappings rather than the position of columns in your file.
What happens if some rows don't match?
Unmatched rows are excluded from the import. Click Download unmatched list, correct your file and upload it again.
Can my file contain extra columns?
Yes. Any columns you don't map to VaultN fields are ignored.
What if my file doesn't contain all the required fields?
You can manually define values for fields that support the Define action. All mandatory fields must be mapped or defined before you can continue.
Can I review my data before importing it?
Yes. VaultN provides an import summary showing matched items, unmatched rows and invalid values before you confirm. No changes are applied until you complete the final confirmation step.
What happens if I start an import but don't finish it?
Unfinished imports are kept for 24 hours. After that, you need to upload your file again. No changes are applied unless you confirm the import.
Can I reuse my field mappings?
Yes. Save your mappings as a Mapping Template and select it during future imports.
Can my colleagues access my Mapping Templates?
Yes. Mapping Templates are shared across your company, so other users can reuse them.
Related pages
Need help? Contact us at [email protected].
Updated 5 days ago